Image Stabilization
Image Quality FactorsIntroduction
Image stabilization refers to how stable the optical system within a camera is during the image capture. If the camera is not stable, then the image will appear blurry. There are many causes of blurred photos, such as weak lighting conditions, the use of long focal lengths, and slow shutter speed in combination with camera shake from a hand-held camera.
The background of image stabilization
Focal lengths
The focal length is the distance between the main level of a lens system and the image focal point for infinity. Depending on the size of the recording area, it determines the angle of view.
A wide-angle camera, for example, has a short focal length meaning the focal point moves closer to the main level. With a short focal length, the angle grows, the receiving area widens, and the image's subject is displayed smaller. For correct exposure, the camera sensor must capture a certain amount of light.
Low-light
If in a low-light situation, the light must be adjusted to achieve the correct exposure. You can make this adjustment by changing the aperture, ISO sensitivity, and shutter speed. So, if there is a low-light situation, you can achieve a higher amount of light by choosing a larger aperture, a higher sensitivity, or a slower shutter speed. The darker it becomes, however, the fewer possibilities are available.
There are many situations where the max aperture is not enough, and increasing sensitivity will have a negative impact on image quality. In this circumstance, lowering the shutter speed is the only choice.
Using a more prolonged exposure can help correct exposure in low-light situations. However, the slower the shutter speed, especially with a hand-held camera, the more the camera vibrations will potentially be captured and lead to blurred images.
Preventing blurred images with shorter shutter speeds
As a general rule, the shutter speed should be at least as short as the focal length's reciprocal.
T = 1/focal length
To avoid image blur from a hand-held camera, keep in mind that the longer the focal length (35 mm equivalent focal length), the shorter the selected shutter speed should be. Using a focal length that is too long will lead to an increase in visible vibrations.
Setting a short shutter speed
You can set a shorter shutter speed for most situations by selecting a larger aperture or a higher ISO sensitivity in the camera settings. Often, however, the camera does not provide the proper settings concerning a photographer's preferences. For example, the photographer may need a smaller aperture number than what is available. Select a higher ISO sensitivity to combat this problem, but doing so often risks amplifying the image signal to a level that increases the noise and lowers the image quality. If a shorter shutter speed cannot be achieved using the camera settings, you can utilize other stabilization methods outside of the settings for blur-free images.
Image stabilization methods
It is essential to understand that short shutter speed is the best solution for capturing a fast-moving object. Without a short shutter speed, the moving object's motion will result in image blur even when using the stabilization methods listed below.


Tripods
The classical way to prevent blurring through slow shutter speed is by using a tripod. Of course, a tripod is not perfect, and much of its effectiveness depends on how sturdy the surface it's situated on is. Additionally, a manual release can cause slight camera shaking, so a self-timer or a camera remote control is recommended.
As reliable as tripods are, they cannot be used in all situations. As a result, most cameras and lenses today have built-in image stabilizers either in the lens (In-Lens) or sensor (In-Camera) to compensate for stabilization issues such as hand trembling.
Optical image stabilizer
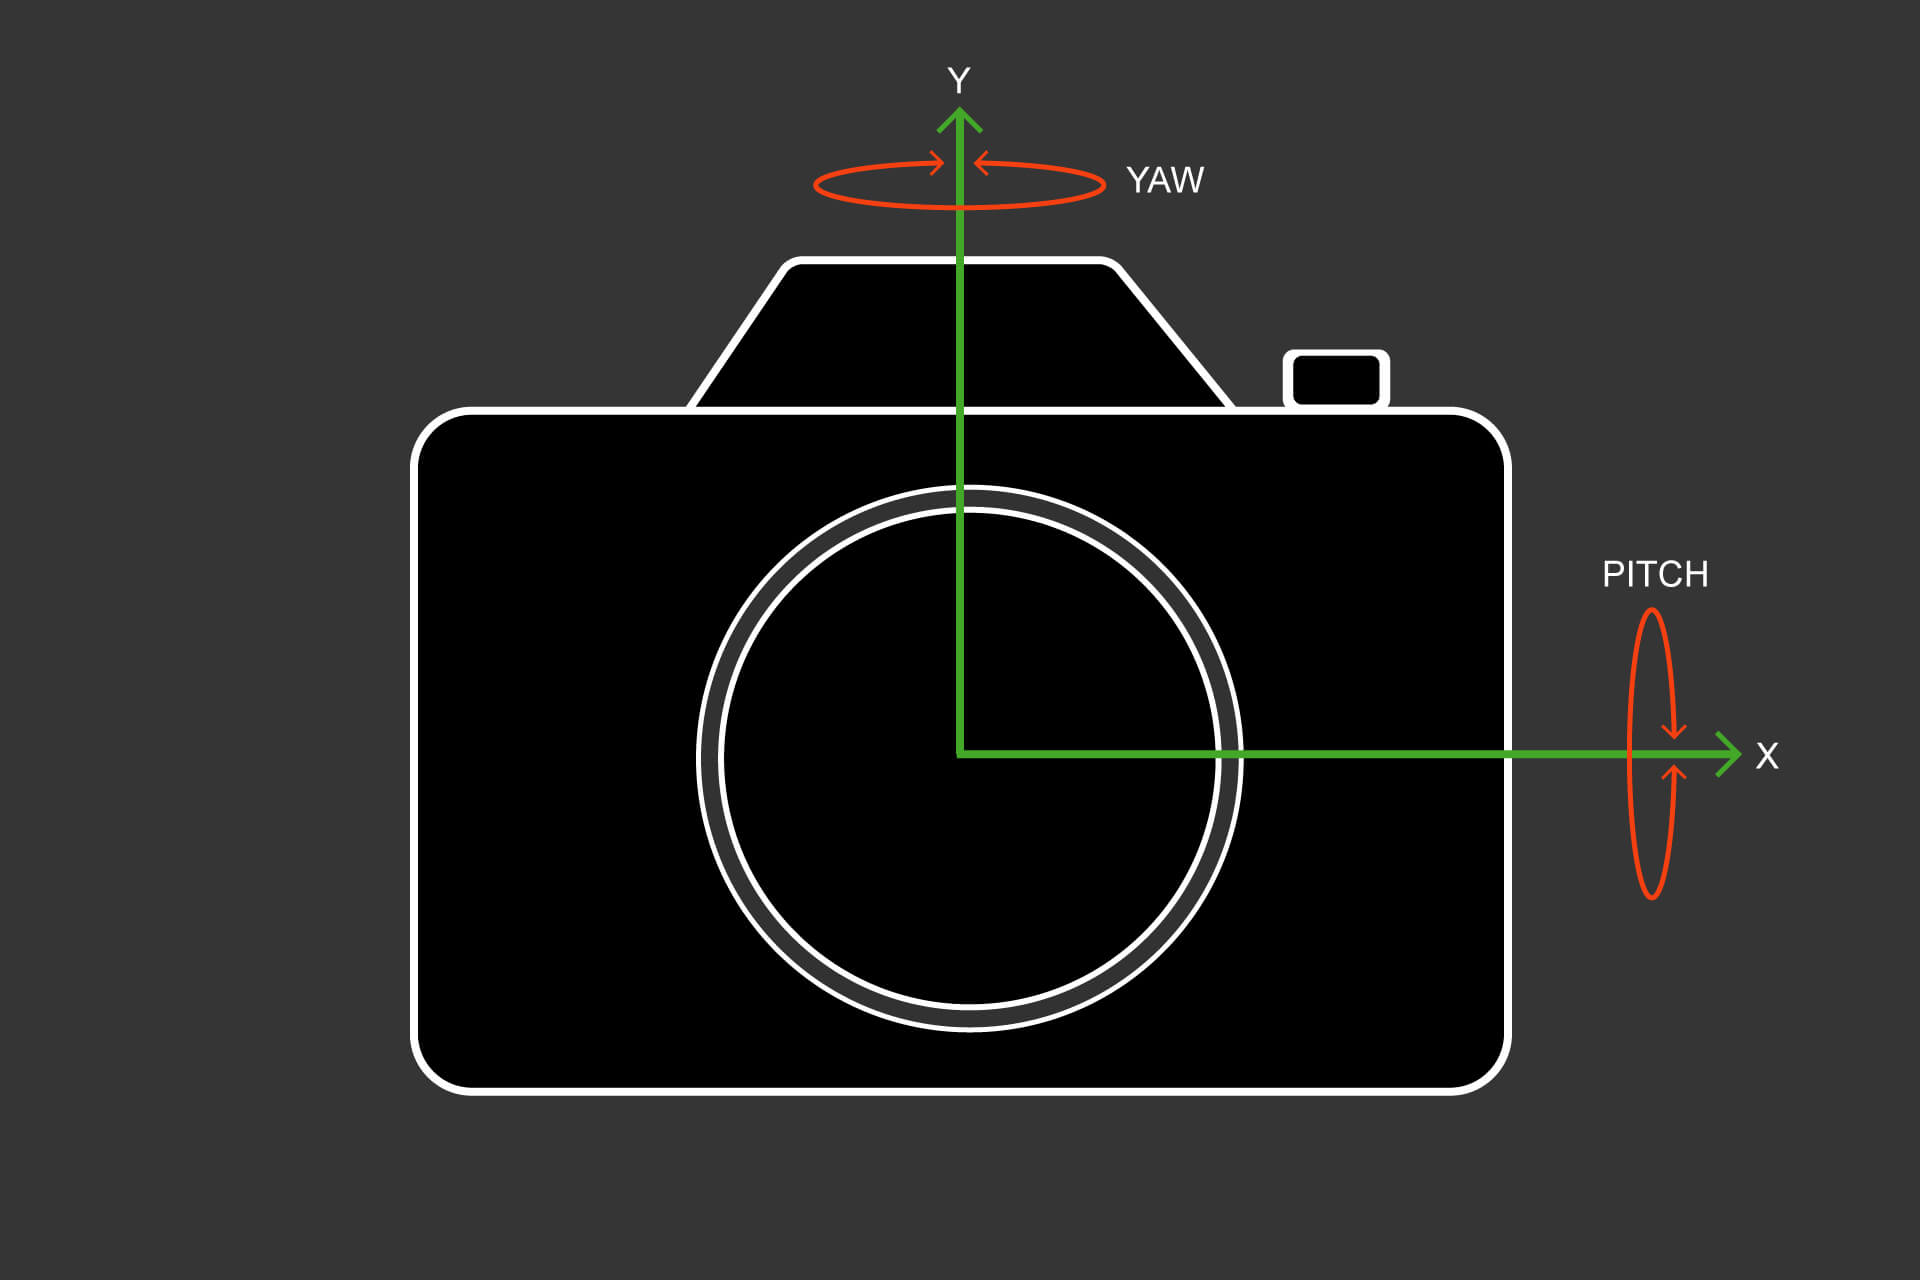
An optical image stabilizer in the In-Lens method contains a floating lens element with corresponding sensors that counteract vibrations. Essentially, small measuring instruments register the movement caused by the photographer and forward the information to a processor that then creates a corrective adjustment with the floating element's help. You can move the element in both horizontal and vertical directions to balance the yaw (rotation on the Y-axis) and the pitch (rotation on the X-axis).
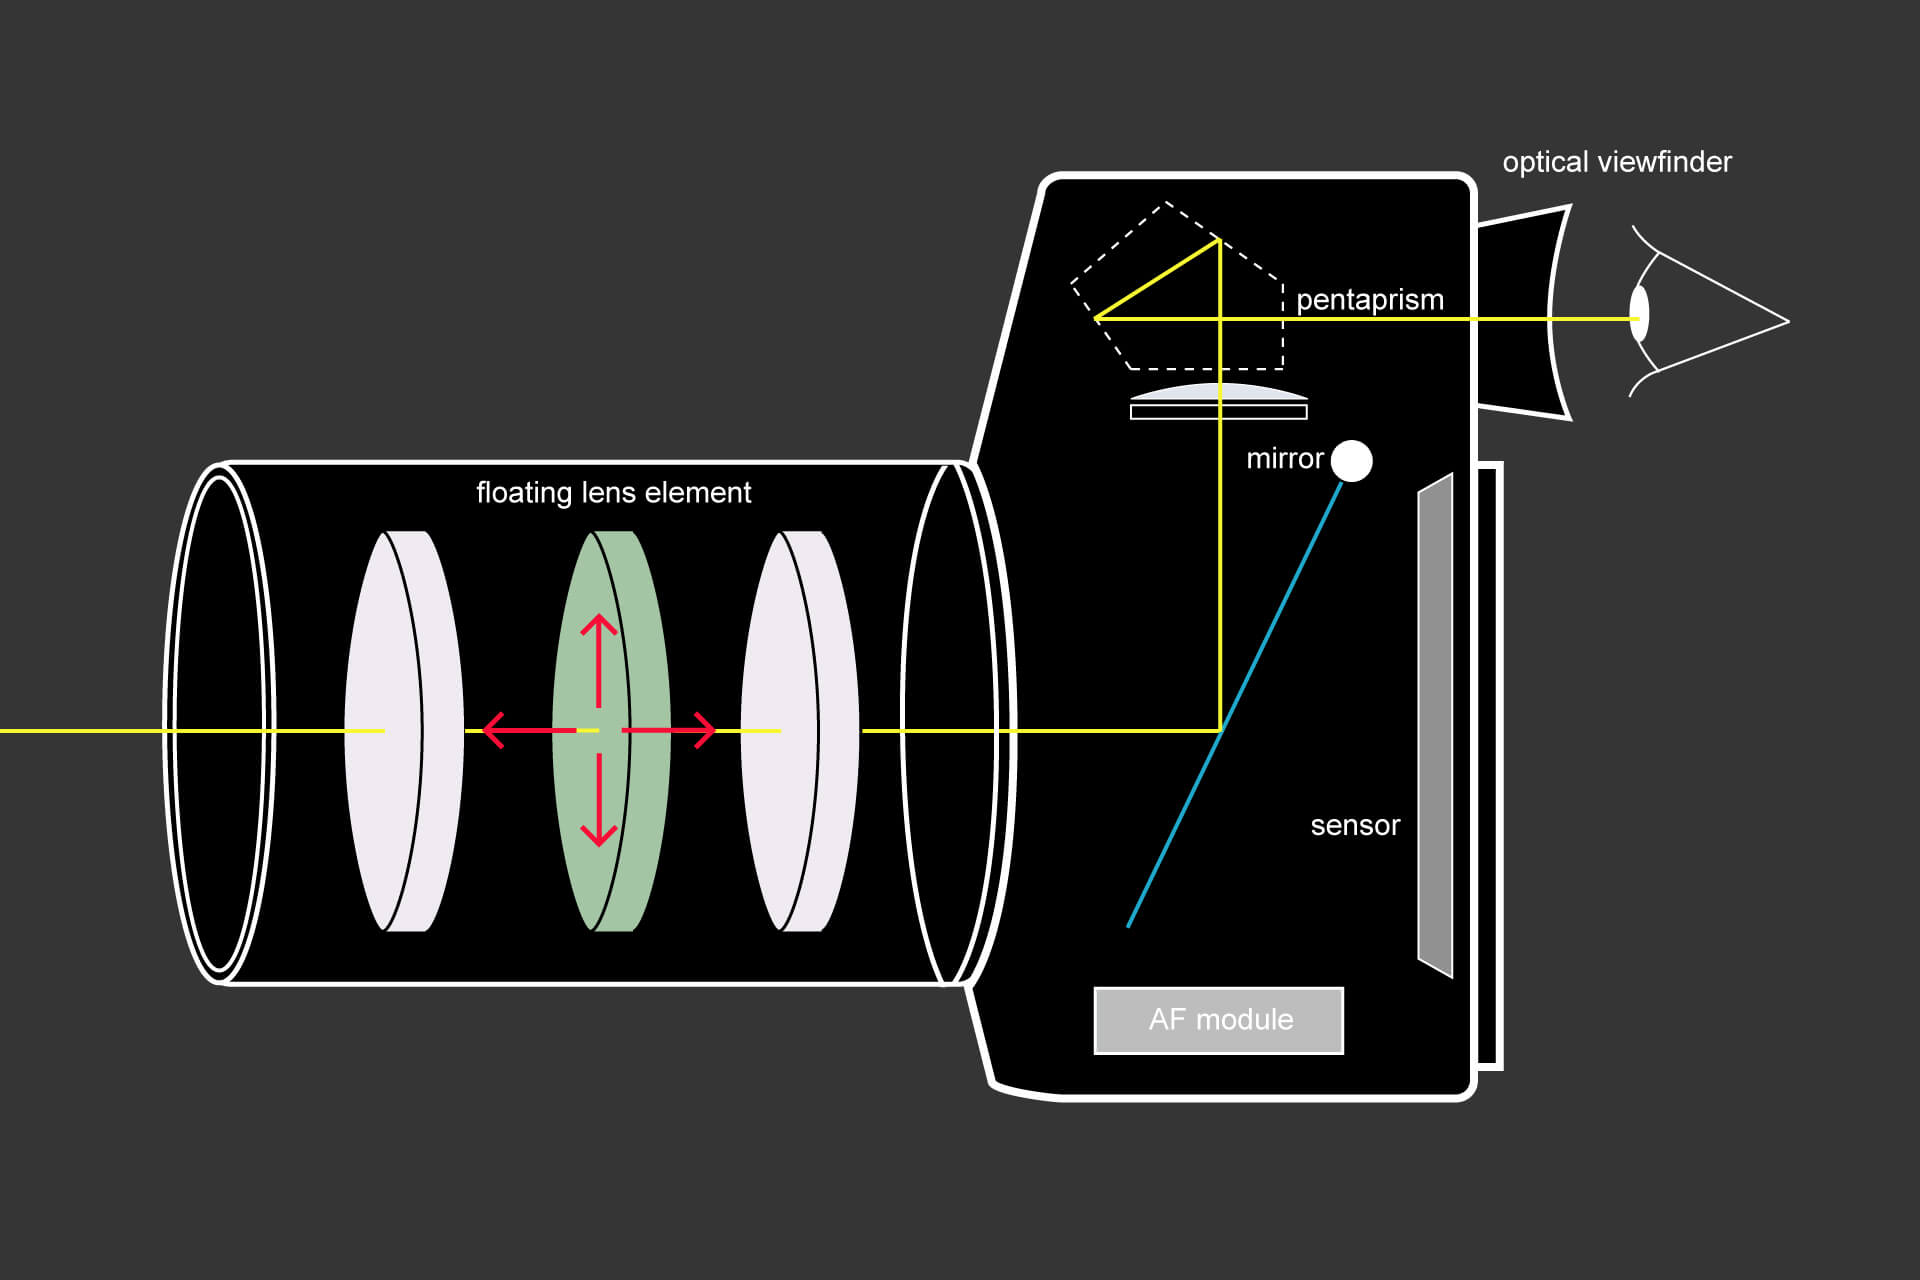
The optical In-Lens image stabilizer is particularly significant in cameras with an optical viewfinder (e.g., telephoto lenses). If the stabilizer is active, it begins working after pressing the shutter button halfway. From there, the stabilized light information passes through the camera's internal mirror to the optical viewfinder allowing the subject to be still in the scene.
The optical In-Lens image stabilizer method is a more common image stabilization method, but it is not available for every lens.
Sensor-shift optical image stabilization
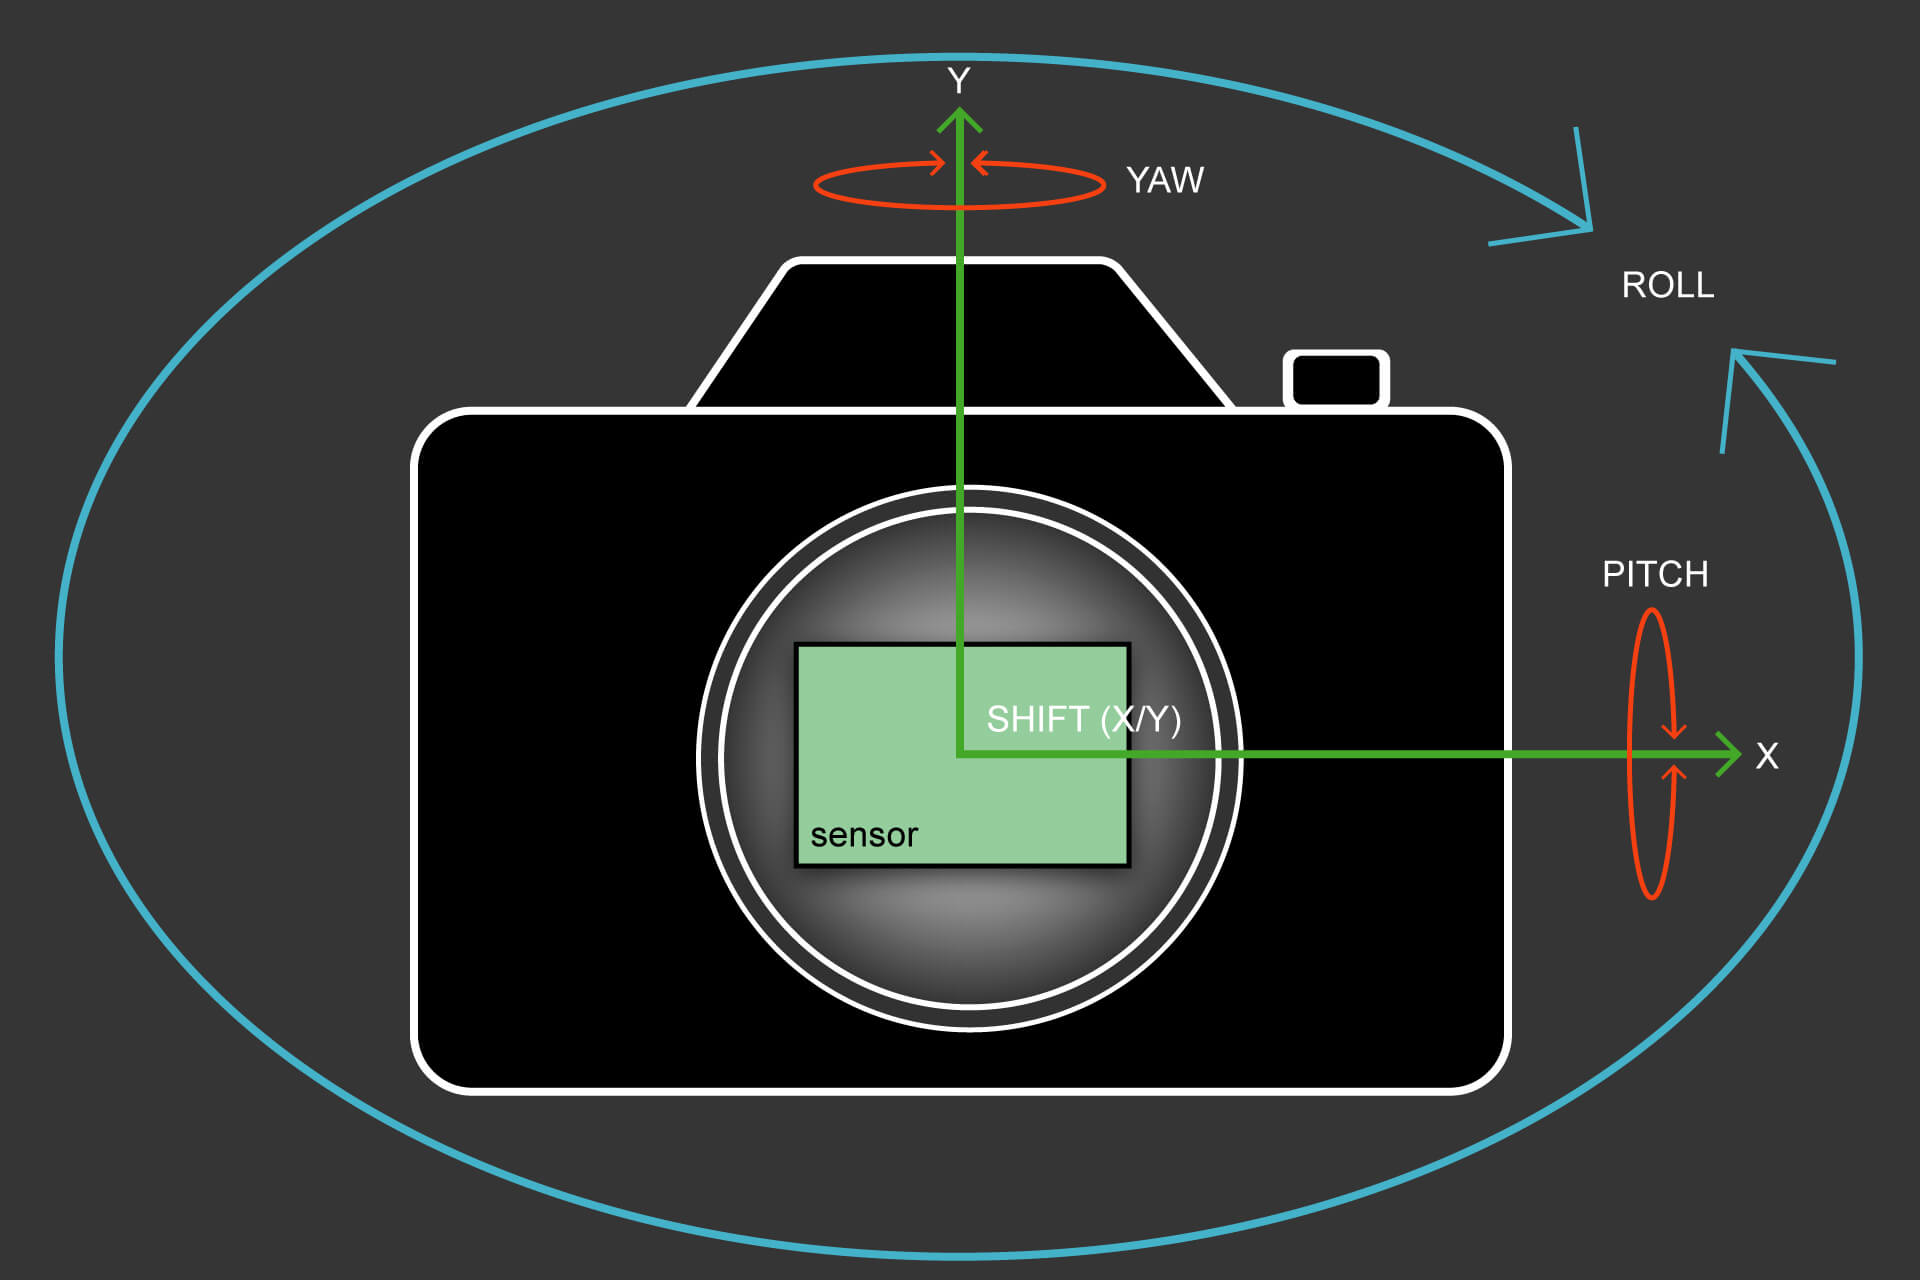
Some manufacturers rely on a sensor-based (In-Camera) stabilizer. Compared to the In-Lens stabilizer where the sensor is fixed, this method uses a free moving sensor to atone for camera shake. In other words, the sensor shifts in the required direction along the x or y-axis depending on the camera movement. In addition to stabilizing the movements along the x and y axes, sensor-shift stabilizers can also offset the rotation along the optical axis (roll), thus eliminating camera shake from three separate axes.
It is important to note that you can simultaneously integrate both the In-Camera and the In-Lens stabilizer into the camera and lens system. In this instance, many cameras select one or the other, but some cameras use both simultaneously. In these cases, the manufacturers have to make sure that they do not negatively interfere with each other and ultimately lead to unwanted blurry images.
Other image stabilization methods
Whereas the before-mentioned image stabilization methods are called (purely) optical image stabilization, additional methods often include "non-optical" aspects. For example, some cellphones manufacturers use methods to combine multiple underexposed images with shorter exposure times to a regularly exposed image by registering the images to each other and connecting the signal levels to a final image. Another method is to combine a regularly exposed blurry image with the edges taken from an underexposed sharp image. One of the difficulties with these methods is defining "the" exposure time for the image that gets reported. Even with that said, the only thing that matters to the user is getting a sharp image even in low-light conditions.
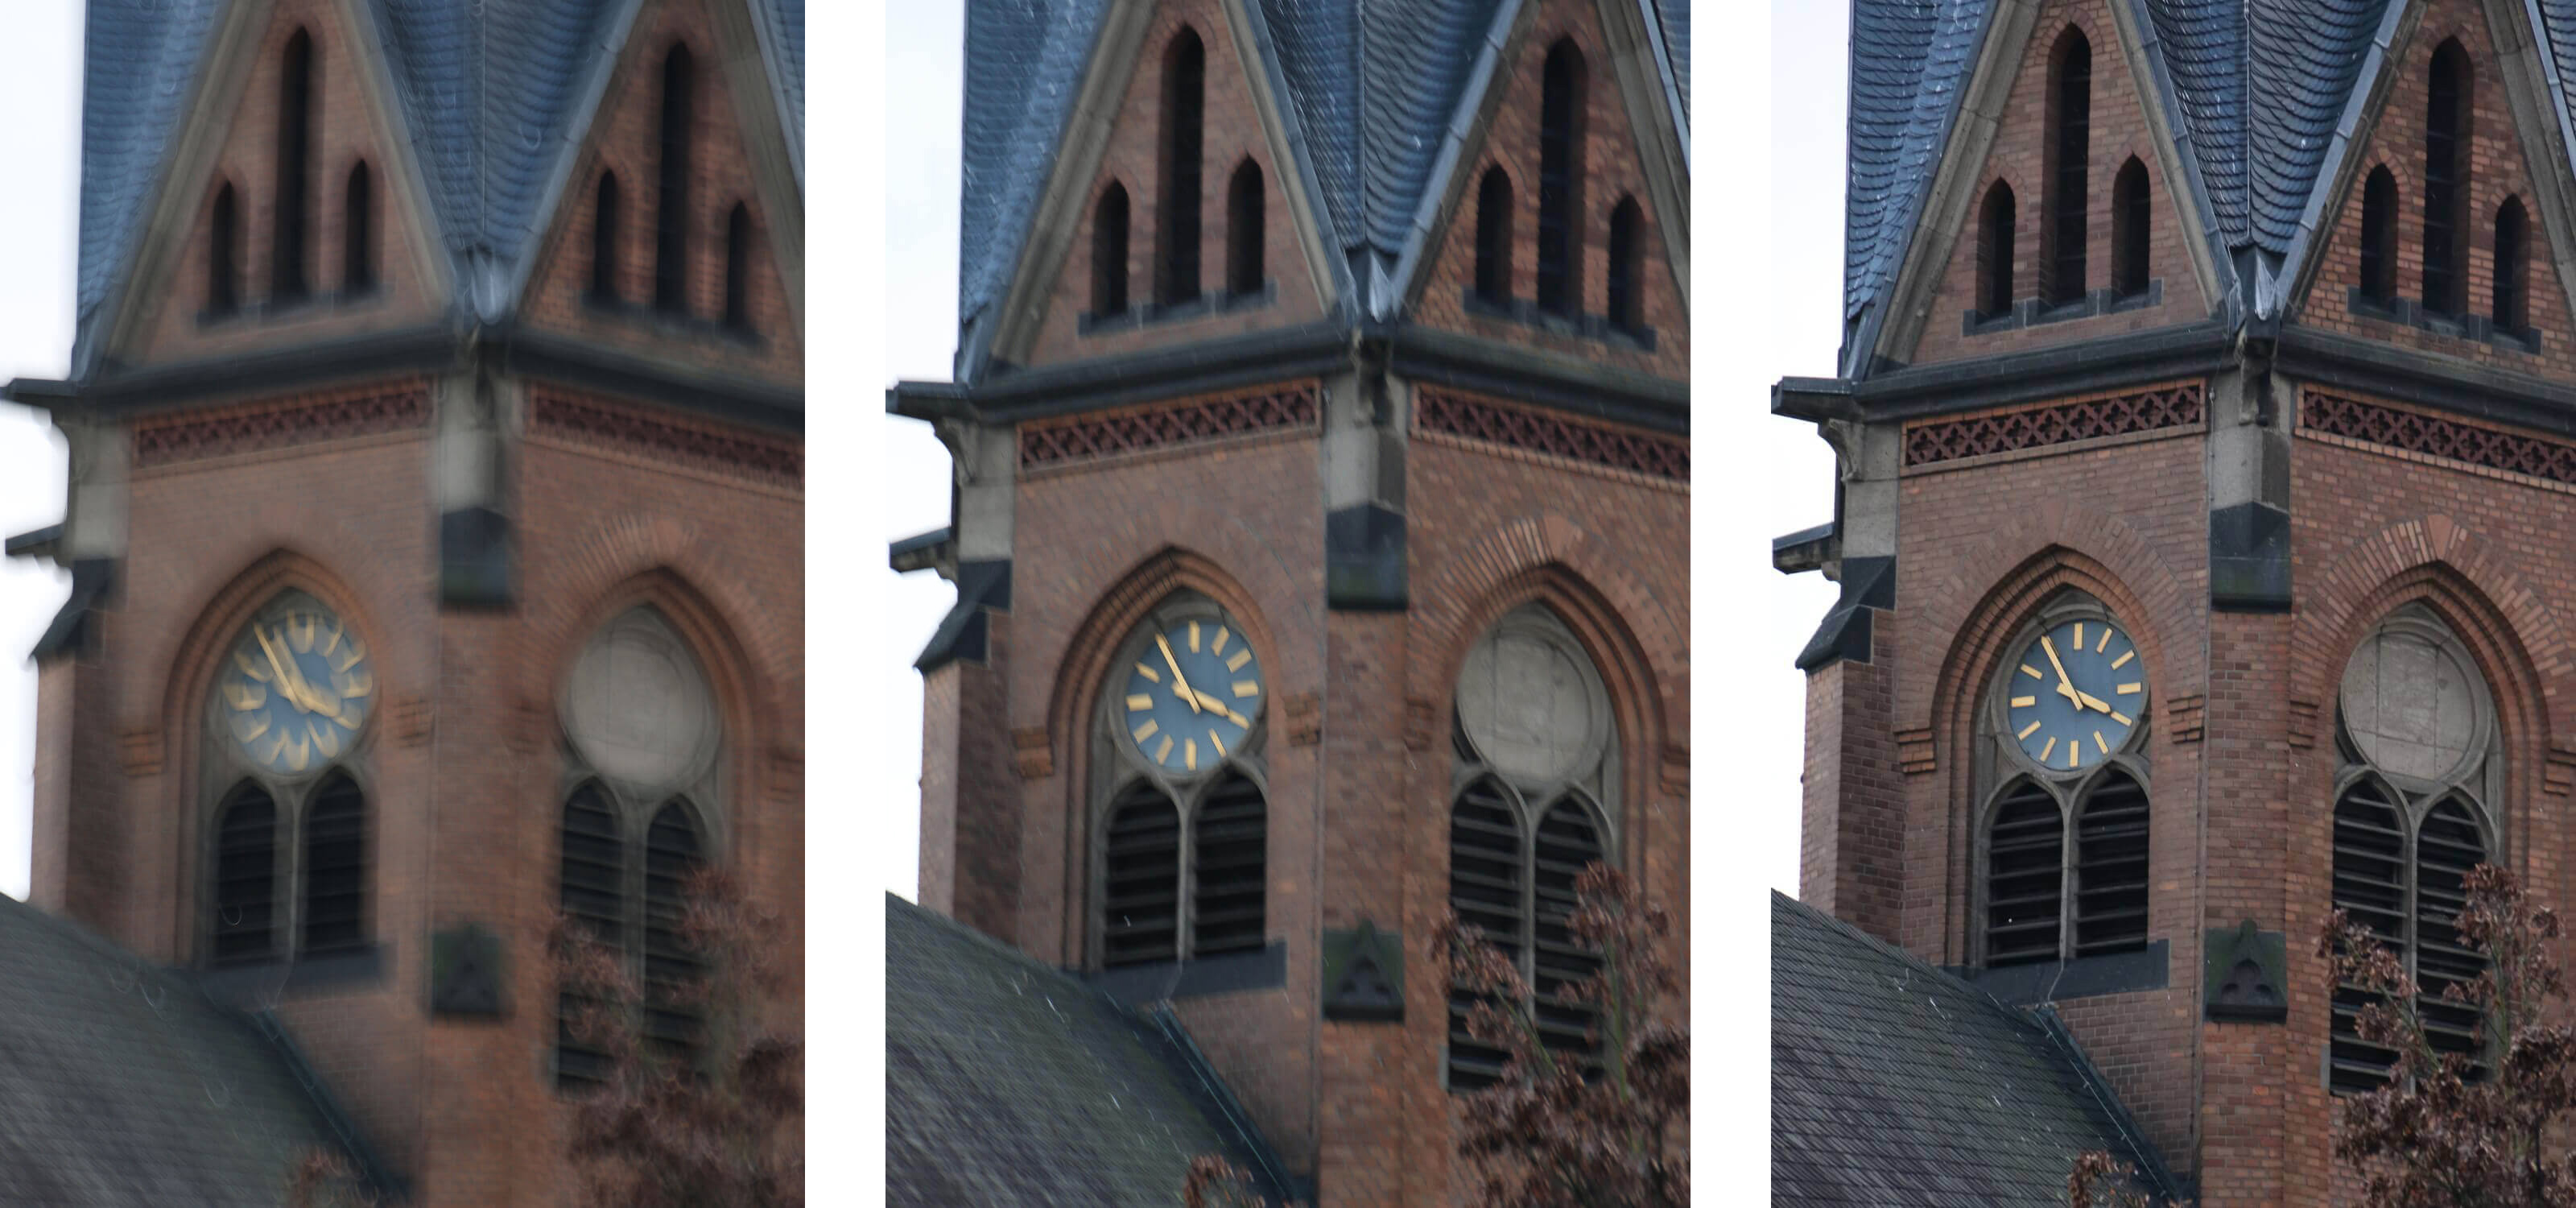
Measuring the quality of your image stabilization system
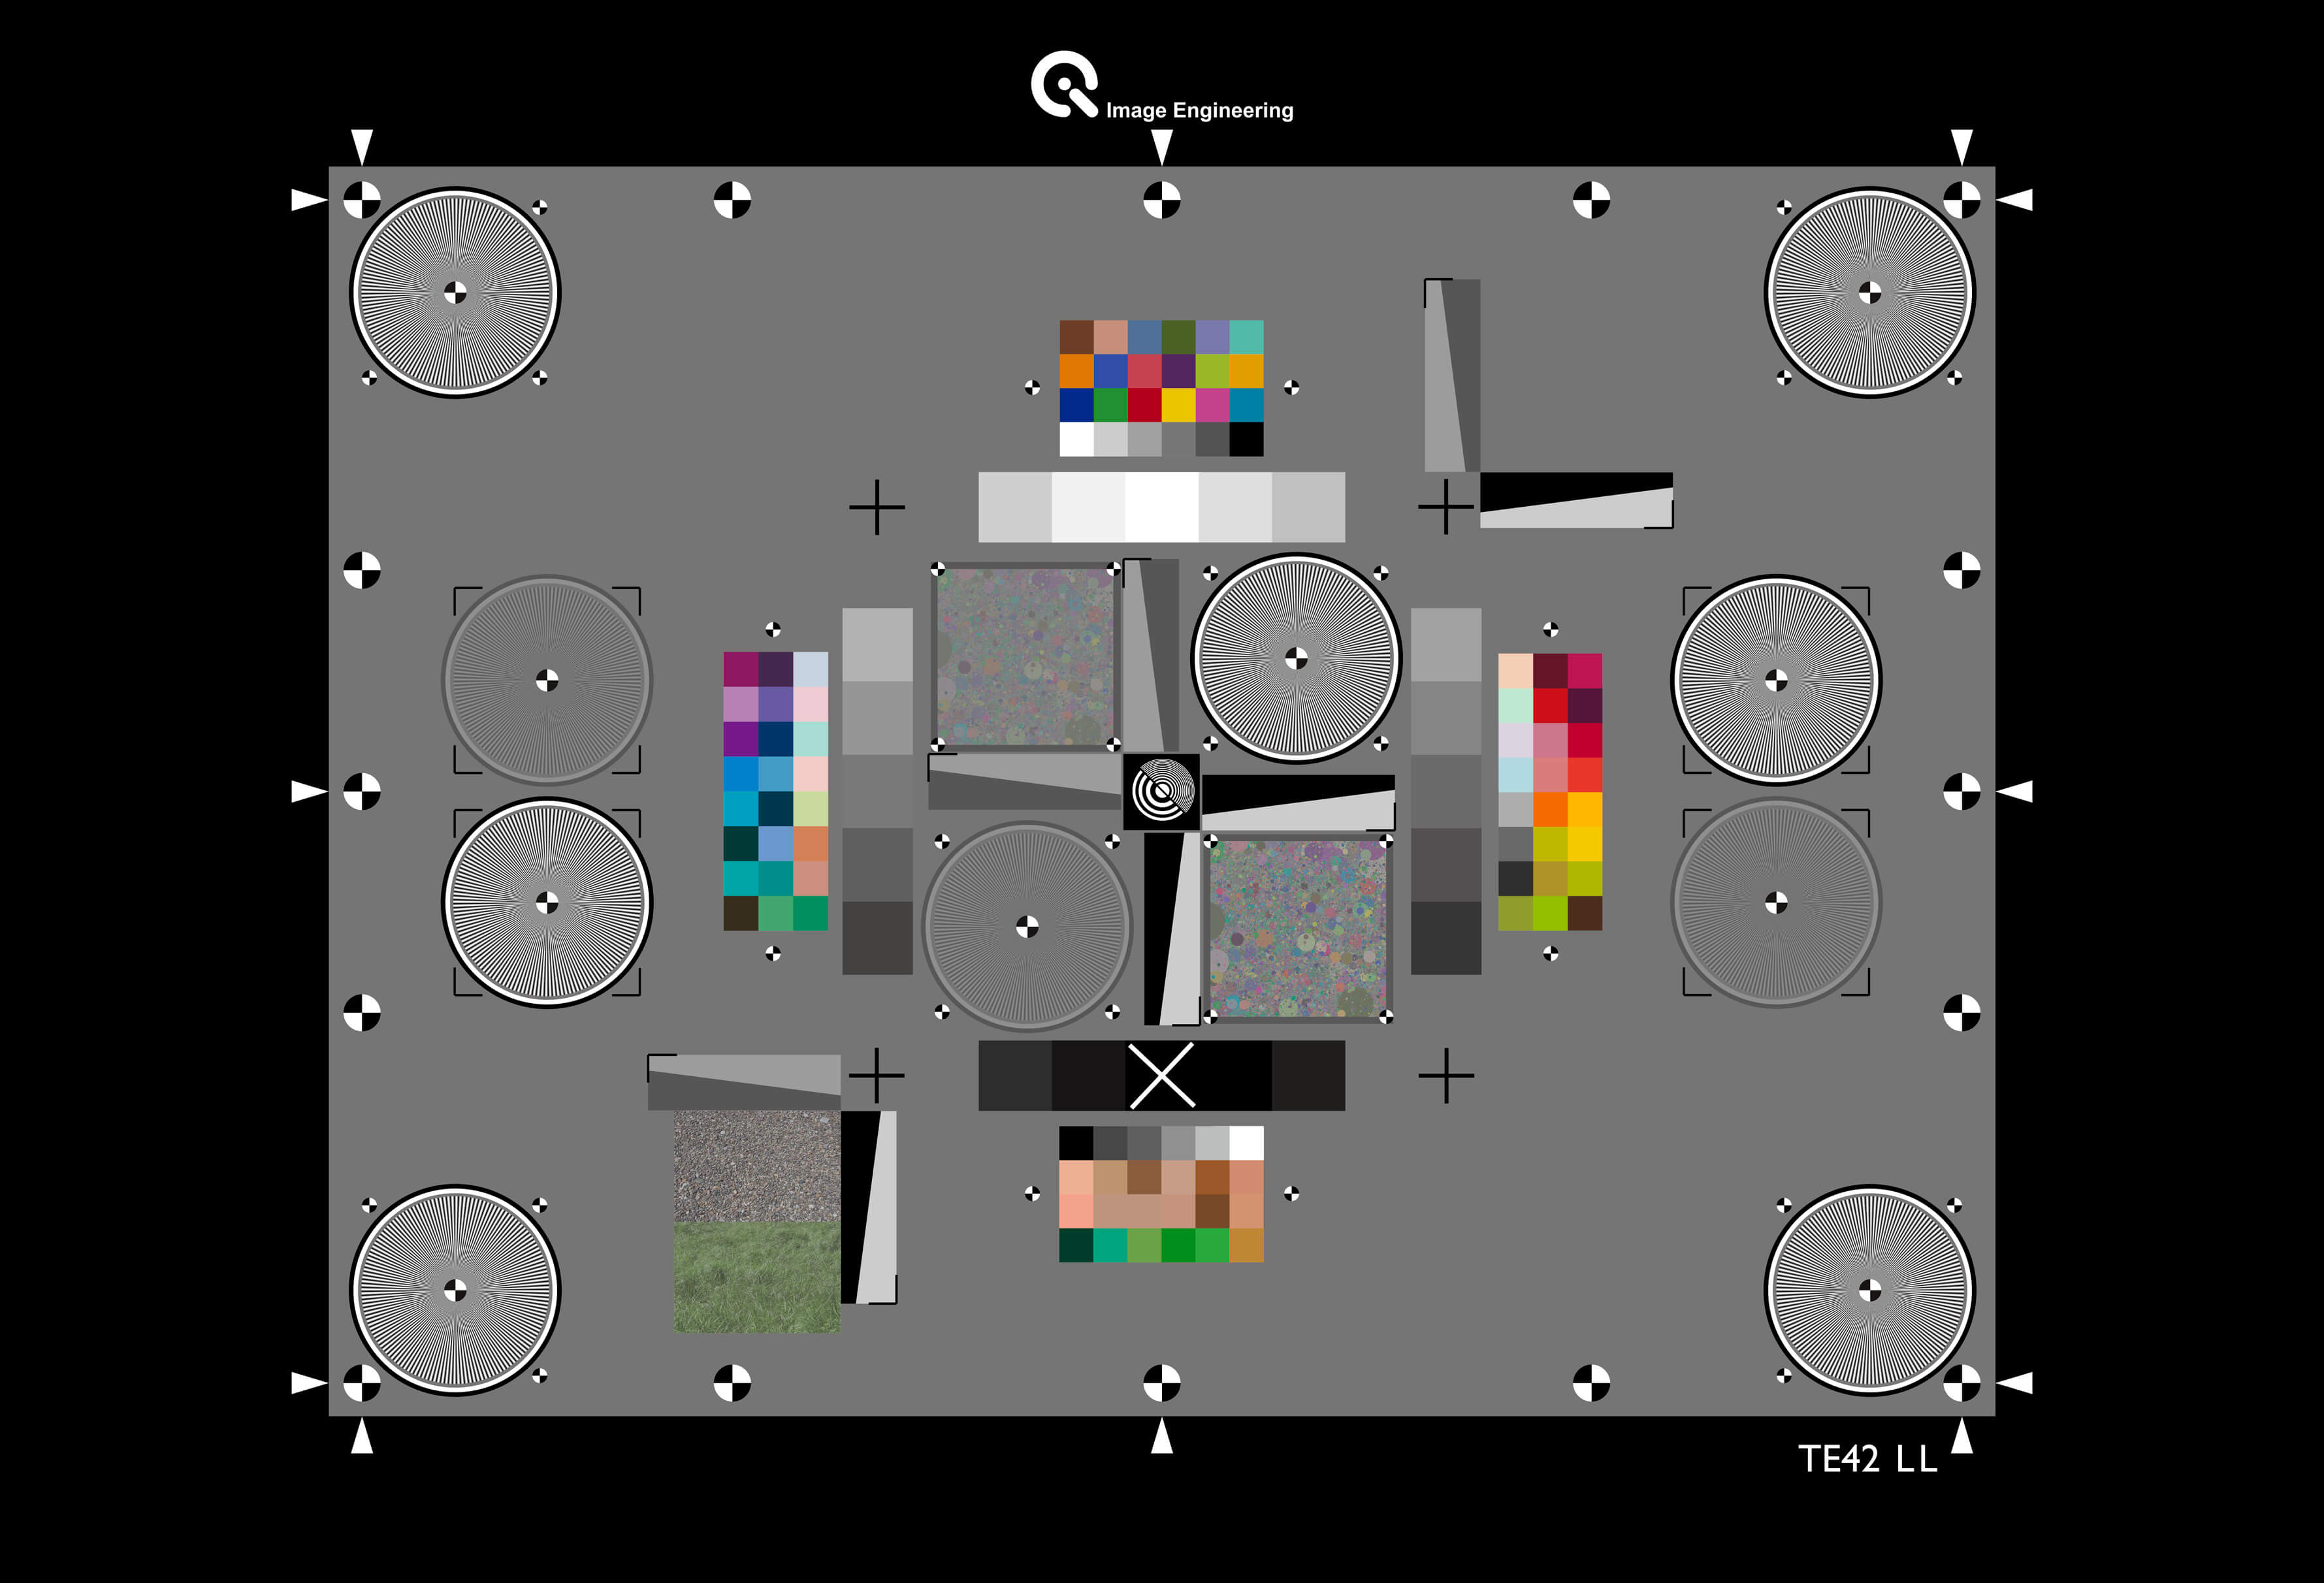
One of the most effective methods for measuring the image stabilization quality in your camera system is using a shaking simulation device and test charts. ISO 20954-1 describes this method.1 With this type of device, you can define and control the camera shaking to produce comparable results. After setting the device, the camera can capture a test chart with sharp images and other potential structures at various exposure times. An evaluation of the edges will report which exposure times will produce blurry edges.
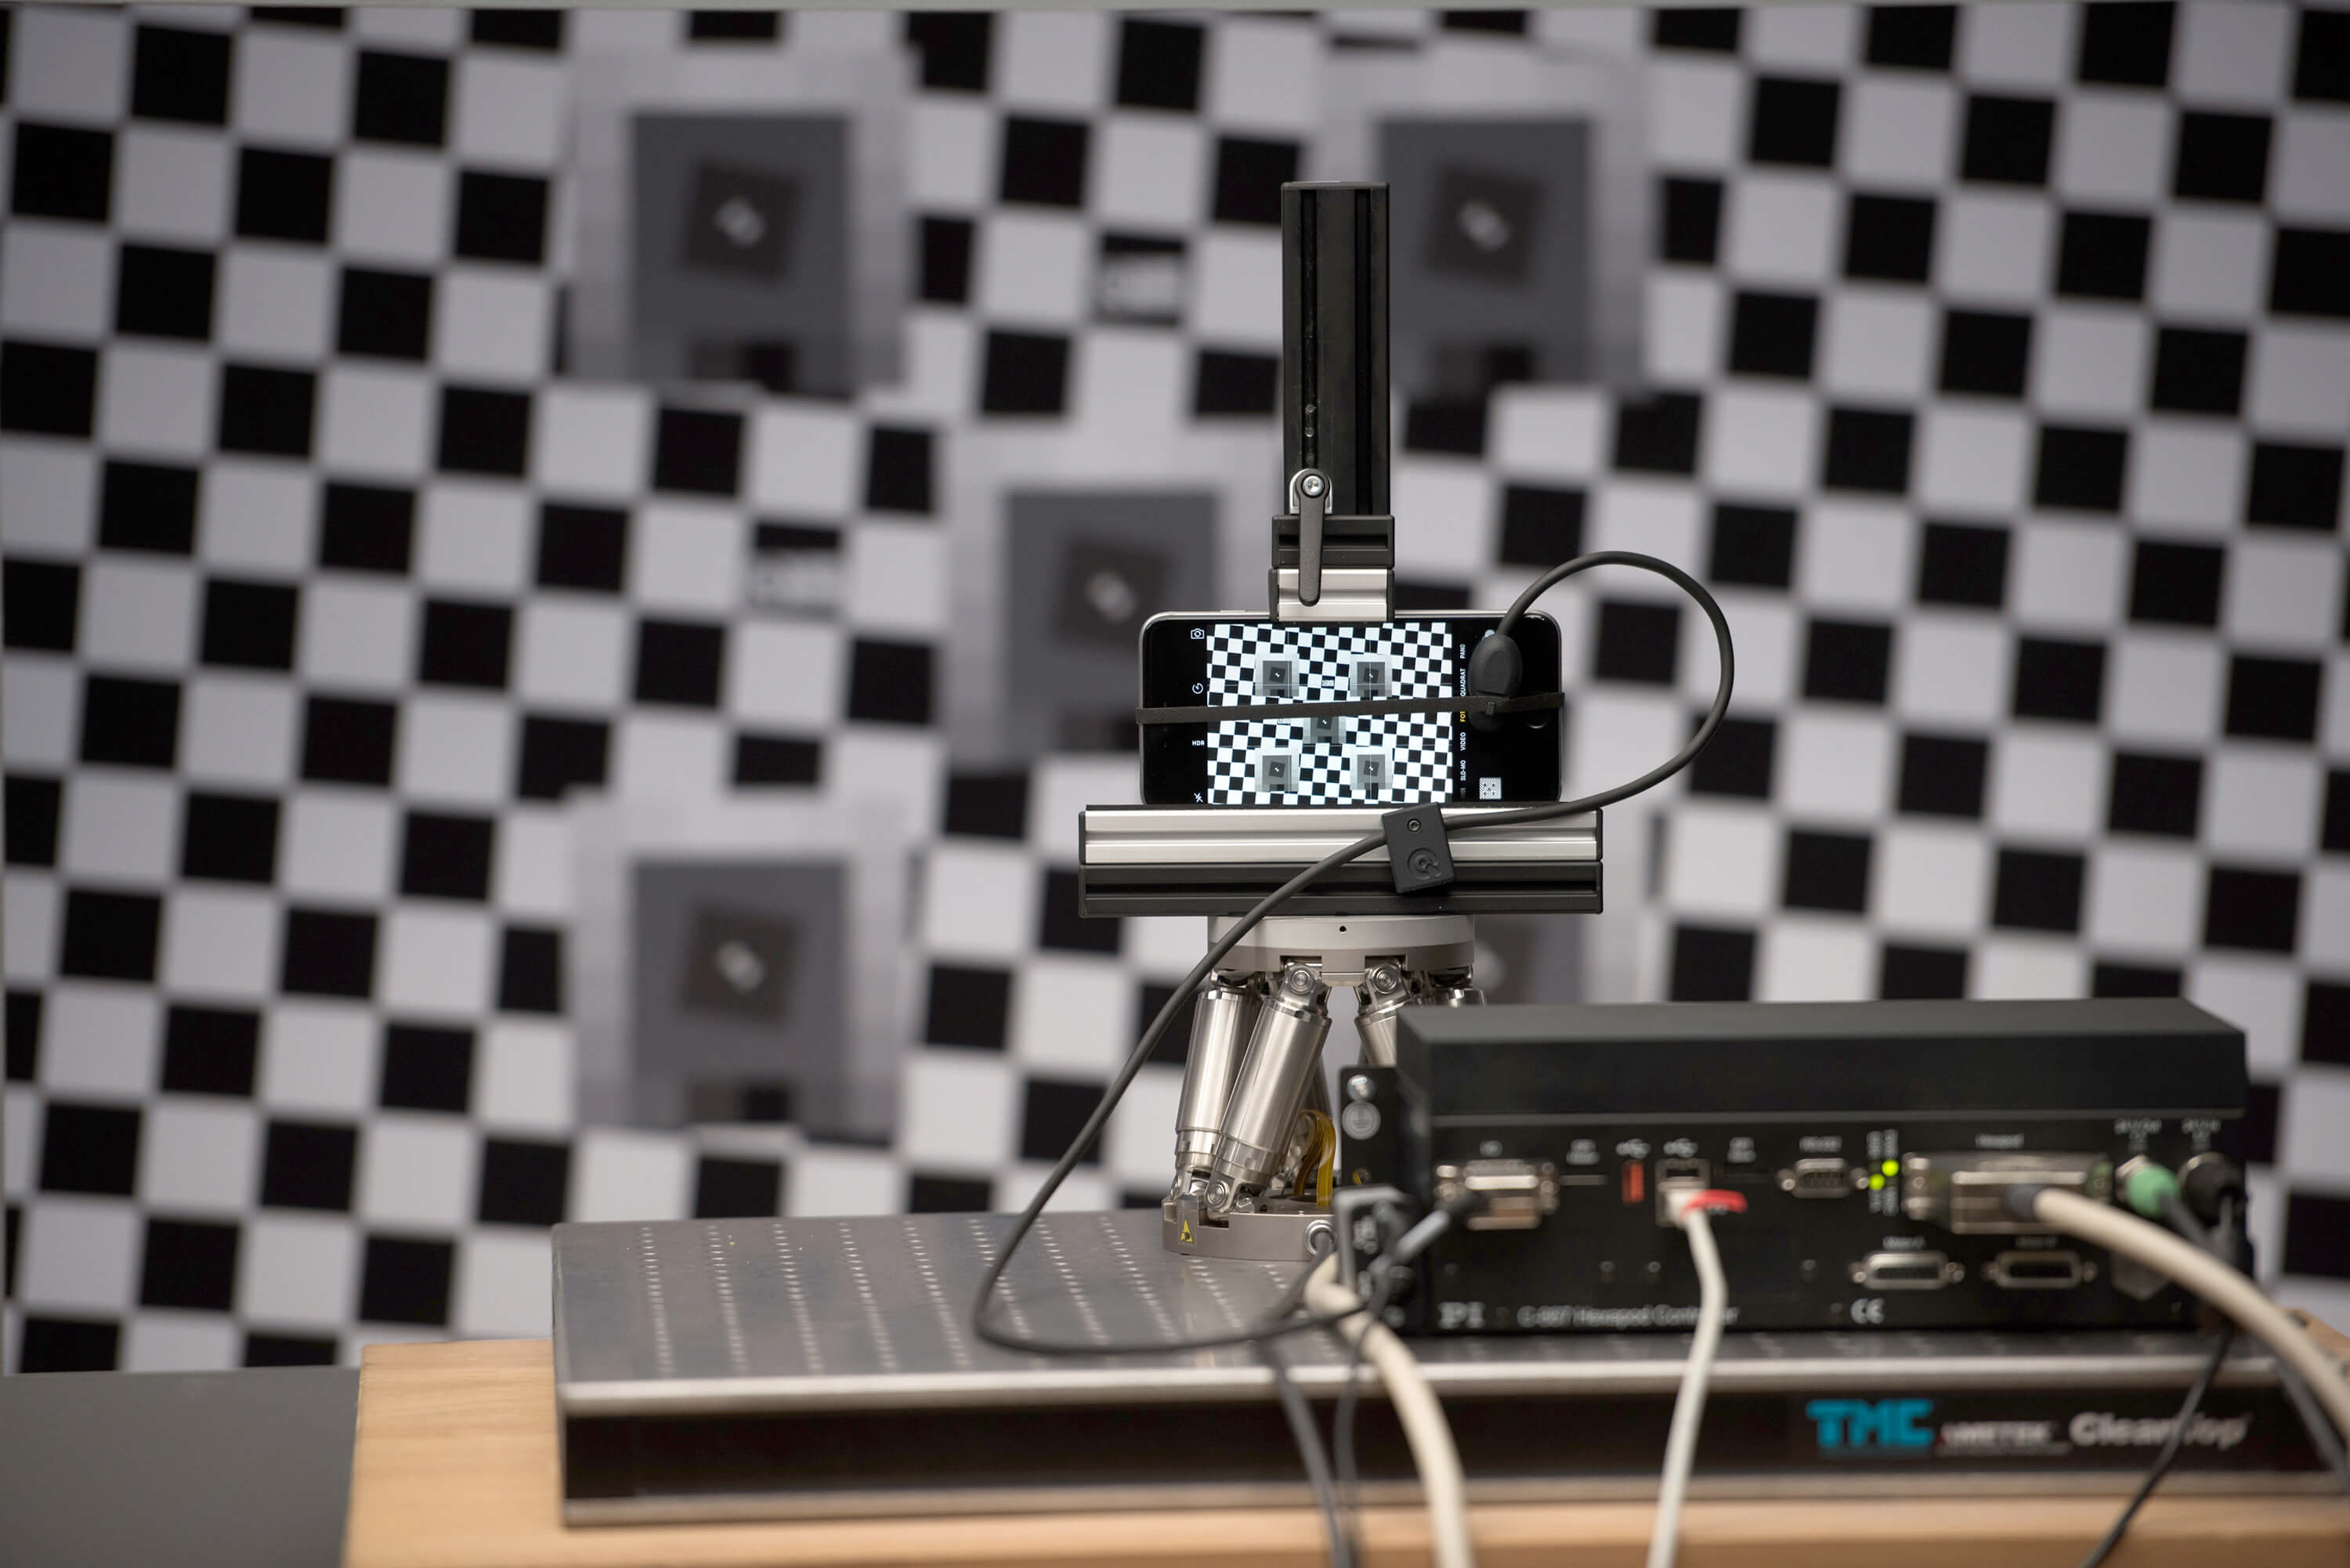
If the exposure time cannot be controlled, the process gets slightly more complicated. For example, when the illumination level on the test chart is modified (reduced), the camera is forced to react by either opening the aperture, raising the ISO speed level, or increasing the exposure time. Raising the ISO speed will lead to higher noise levels or a loss (noise reduction) of low contrast fine details, known as texture loss. An increase in the exposure time will again lead to blurry edges in the absence of an image stabilization method. For these situations, the test chart will need to be more complex with targets for analyzing noise and texture loss.
Conclusion
Image stabilization refers to how stable an optical system of a camera is during capture. Without a stable system, images will appear blurry and affect the overall image quality. Methods such as using a tripod, an optical stabilizer, or sensor-shift optical image stabilization can help improve image stabilization. It's still also essential to test the quality of the camera's image stabilization capabilities.
When testing the camera, we recommend following ISO 20954-1 and using a slanted edge test chart and a camera shaking simulation device. This device will allow you to define the shake level and then quickly test various exposure times with the slanted edge test chart and see which ones lead to the most blurring. For low light testing, we advise using a chart with targets for measuring noise and texture loss.